One of the biggest challenges to overcome when installing and finishing drywall is figuring out how you sand your drywall while limiting dust?
Eliminating dust while you work not only cuts down on your eventual cleanup and means you’ll have to stop less while you’re working, but it also creates a much more comfortable and safe working environment.
While drywall dust is not toxic, the drywall compound on your seams may contain silica – a harmful substance. Even while wearing a dust mask and eye protection, you still may experience irritation from excess dust in the air.
This article will explore the best ways to finish your drywall sanding while minimizing the amount of dust produced.
Table of Contents
Cutting Down On Dust
The easiest way to eliminate a lot of dust when dry sanding is to use a dustless drywall sander. These power sanders usually have vacuum cleaner attachments or built-in dust collection mechanisms meant for eliminating dust as you sand. About 95% percent of dust goes right into the Shop-Vac or dust collection system.
Power drywall sanders cut time by making sanding much quicker and eliminating much of the cleanup you would have to do with an orbital or manual sander. Drywall sanders can be purchased for around $100 on the low end and make sanding large areas of drywall nearly dust-free.
Now, though a big project calls for a big tool, how do you eliminate dust when doing smaller jobs, patching drywall, and using a manual sander on corners and hard-to-reach areas?
You can employ several methods that result in a minimal amount of dust and some tricks for cutting down on both the amount of dust that gets into the air and the dust that inevitably makes its way into other areas of the house.
Wet Sanding Drywall
Though wet drywall sanding is a sure-fire way to cut way down on dust, it’s not without its drawbacks. Wet sanding is time-consuming. You cannot use a power drywall sander to wet sand – you will have to do it manually, and it doesn’t create a perfectly smooth surface.
This could be to your advantage if you’re trying to recreate the surface of textured walls because the flexible drywall sponge will leave little waves in the drywall compound. If you do decide to wet sand your drywall, you’ll need specialty sanding sponges and plenty of water.
To wet-sand drywall, work along seams in small circular motions, applying light pressure and making sure to ring out your sponges and keep the water clean while you work. If you need to quickly prep your drywall for paint, you should dry sand your wall surface – wet sanding is time-consuming.
Use A Sanding Block Vacuum Attachment
When you’re doing something like re-taping seams or getting into corners, you can buy a special drywall hand sander kit, a manual sanding block with vacuum attachments. Attach your sanding screen and sand slowly, letting the vacuum suck up the dust.
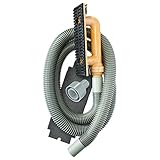
- Drywall hand sander attaches to any wet/dry vacuum for sanding without dust throughout your worksite
- Protects furniture, floors, electronics-and your lungs-from invasive drywall dust
- EasyClamp system allows sanding screen replacement quickly and easily
It might be slower going than a manual sanding block without an attachment, but you’ll make up time in the clean-up.
The budget version of this is to hold your vacuum cleaner hose next to the sandpaper or sanding block, but if you’re doing more than just a patch, a vacuum cleaner attachment is worth investing in.
Catch Dust As It Falls
There are a couple of creative methods for collecting compound dust as you sand. You can get some blue painter’s tape – easy to find at your local hardware store – and place it just under the spot you’re sanding.
The majority of the falling dust should get caught on the tape. Sure, it’s not an option for large areas, but for small repairs, it’s an easy option for quick cleanup.
Use a dustpan tilted underneath your sanding work. This works similarly. You’ll have to empty it periodically so you don’t throw the fine particles back into the air.
Protecting Your Home From Dust
Installing or repairing drywall will cause dust – there’s no way around it. Even doing everything you can to minimize dust, some will escape.
When you’re embarking on a big stretch of drywall, you should take measures to make eventual clean-up easier.
- Cover your floor with a tarp and tape around the edges.
- Seal the room and limit entrances/exits.
- Cover vents in the room, and turn off central air and heating that might carry dust.
- Consider using a dust compound on uncovered floors – it weighs down dust, so it doesn’t get carried into the air.
Minimize Dust While You Work
Cleaning as you go will save time in the long run. It reduces the amount of joint compound dust you’ll end up carrying to other parts of the home and creates a safer work environment.
Take time to sweep up piles of dust that collect, and don’t work your drywall sander or hand sander faster than your shop vacuum can work.
Use a heavy-duty HEPA filter in your Shop-Vac to prevent particles of the compound from spewing back out into the air.
Use a drywall screen on your sanders – regular sandpaper will clog an electric sander, but a screen allows dust to escape from between the surface of the joints and the screens.
Sanding is one of the most grueling and messiest stages of drywall installation. There will be some dust, but you can take measures to minimize the dust you create and the amount of dust that escapes for later cleanup.
The best-case scenario is that you have (or can rent) a dustless power sander. These machines make sanding a breeze even for a non-professional, and the dust collection systems eliminate the vast majority of compound dust you create.
When working on small areas, consider wet sanding with appropriate drywall sponges and fresh water, or buy a manual sander with a vacuum attachment.
A few precautions like covering floors and surfaces and cleaning as you go will make the eventual dust collection much easier. Take it slow, and you should have a minimal amount of dust when you’re finished.